How to Match Lash Types to Client Eye Shapes for Long-Lasting Results
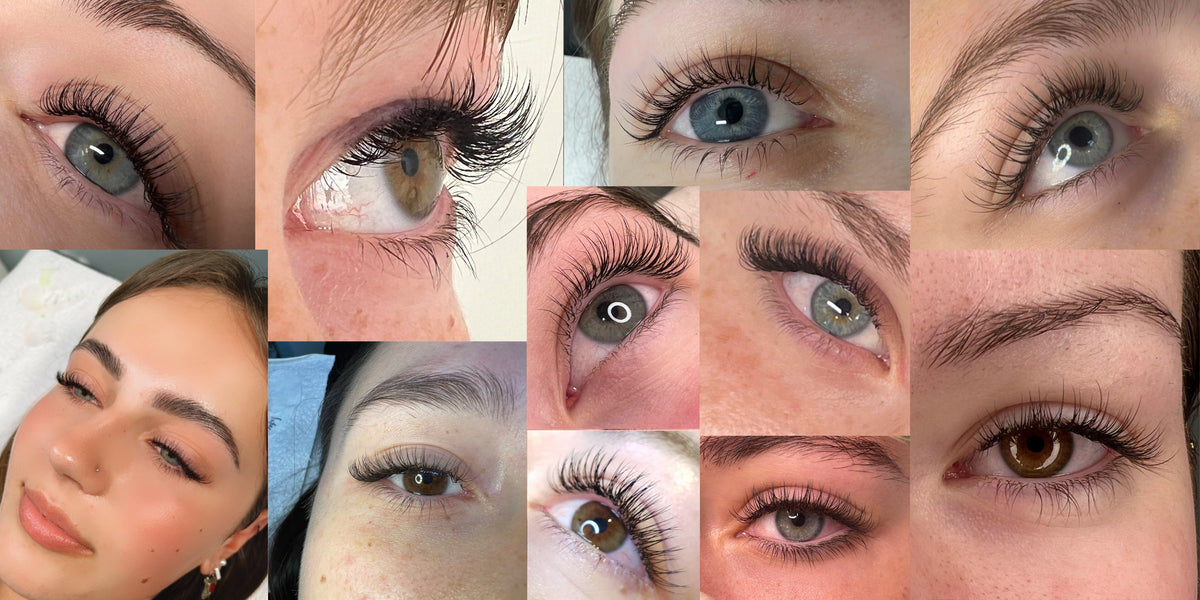
A client books in for a refill three weeks early. Not because her lashes have fallen out, but because she wants to show her sister how good they look. That's what happens when you match lash styles to eye shape properly. This isn't about following rigid rules or memorising complex charts. It's about understanding which combinations make clients look like the best version of themselves, then watching them come back and bring friends. This skill separates lash artists who build waiting lists from those who struggle to fill their books.
Why Eye Shape Matters More Than You Think

The same cat-eye map that looks stunning on almond eyes can make round eyes appear smaller and hooded eyes practically invisible. It's not the quality of your work that's the problem. It's the mismatch between the style and the canvas you're working on.
Client retention lives in these details. When lashes suit someone's face, they don't just like them. They feel seen. They notice that you didn't give them the same look as everyone else. That's what brings them back every three weeks for years.
The beginner mistake? Picking one safe style and using it on everyone. Usually a natural cat-eye with C curl, 10-12mm lengths. It works fine on about half your clients. The other half leave thinking lashes just don't suit them, when really, that particular style doesn't suit their eyes. You've lost them before they've given you a proper chance.
This isn't about becoming an anatomy expert. It's about looking at someone's eyes for thirty seconds and knowing which direction to take your length and curl decisions.
The Quick Eye Shape Assessment (What to Look for in 30 Seconds)

Do this during your consultation while you're mapping, not as a separate formal assessment. Ask your client to look straight ahead at you, then check three things.
First: can you see their lid crease when their eyes are open? If yes, you've got visible lid space to work with. If the skin fold covers most of the lid, you're working with hooded eyes and you'll need to adjust your approach.
Second: look at the outer corners. Do they sit higher than the inner corners, lower, or roughly level? This tells you whether you're working with upturned, downturned, or almond eyes. It affects where you'll place your longest lengths.
Third: check the width between their eyes compared to the width of one eye. Roughly one eye-width between is standard. Less than that, they're close-set. More, they're wide-set. This determines whether you'll concentrate volume inward or outward.
Most eyes are a combination. You're not looking for a perfect category. You're identifying the dominant feature that will guide your technical choices. If you're exploring more advanced techniques beyond basic shape matching, our Articles section covers specialist applications and trending styles.
Almond Eyes: The Balanced Canvas
You'll recognise almond eyes by their visible lid, balanced proportions, and slight natural upward tilt at the outer corners. The iris sits neatly between the lids with a small amount of white visible on either side.
These eyes suit most styles because they're the shape most standard lash maps are designed for. If you're new to customisation, start here. A classic cat-eye or natural map will look good without much adjustment. This is your practice ground for building confidence before you tackle trickier shapes.
Don't overthink it. Almond eyes are the easiest shape to work with. If you're second-guessing yourself, you're probably overcomplicating it.
Round Eyes: Creating Length Without Losing Openness
Round eyes have a wide-open appearance with visible iris above and below the pupil. They often look alert or surprised even in a relaxed state.
Your goal is to elongate without making the eyes look smaller or weighed down. Use longer lengths at the outer corners to create horizontal emphasis. Avoid concentrating too much volume in the centre, which draws attention to the roundness rather than balancing it.
The common mistake? Using too much curl. D curl on round eyes can emphasise the circular shape rather than softening it. Stick with C curl and let length do the work of creating elongation.
Hooded Eyes: Working with Limited Lid Space
Hooded eyes have lid space hidden by a skin fold. When the eyes are open, the lashes may partially or completely disappear under the hood. This is the shape that catches out inexperienced artists most often.
Your strategy is visibility. Use stronger curls (C or D) and strategic length to ensure the lashes show when the eyes are open. Focus your longest lengths at the centre and outer corners where the lashes remain visible. The inner corners often get lost in the hood, so don't waste dramatic length there.
Flat curls or very long inner corner lashes disappear completely. You'll do beautiful work that nobody sees. Frustrating for you, disappointing for the client.
Downturned Eyes: The Lift Strategy
Downturned eyes have outer corners that sit lower than the inner corners, creating a gentle downward slope. The goal is visual lift without looking unnatural or overdone.
Concentrate your longest lengths from the centre to the outer corner, using stronger curls (D) at the outer edges to create upward emphasis. This is counterintuitive, but avoid placing your very longest lashes at the extreme outer corner. It can drag the eye down further rather than lifting it. Stop your longest point just before the outer corner, then taper down slightly.
Upturned Eyes: Balancing the Natural Lift
Upturned eyes have outer corners naturally higher than inner corners. Often called cat eyes, they already have built-in lift. Your job is balance, not enhancement.
Use even length distribution or place slightly longer lengths at the inner corners to soften the natural angle. This prevents the eyes from looking too severe or overly dramatic. Dramatic cat-eye maps on already upturned eyes can look harsh rather than flattering. You're working with the natural shape, not fighting against it.
Close-Set Eyes: Creating Width and Balance
Close-set eyes have less than one eye-width of space between them. The goal is to draw attention outward to create visual balance across the face.
Use shorter lengths at the inner corners, gradually increasing to your longest at the outer corners. This pulls focus toward the sides rather than the centre. Avoid heavy volume at the inner corners, which emphasises the closeness you're trying to balance out.
Wide-Set Eyes: Bringing the Focus Inward
Wide-set eyes have more than one eye-width between them. Your strategy is to create focus toward the centre of the face.
Place slightly longer lengths at the inner corners. Balanced maps or doll-eye styles work well here. Avoid extreme cat-eye styles that pull focus further apart. You're bringing the eyes together visually, not pushing them further toward the temples.
Your Matching System: Curl, Length, and Map Decisions for Each Shape

Eye shape tells you what to do. Curl, length, and map are how you do it. These three elements work together, not separately. Understanding how they interact is what turns assessment into actual lash application.
Curl Selection: Which Curves Work Where
Start with this simple reference. B or C curl for almond and upturned eyes. C or D for round and hooded eyes. D curl specifically at the outer corners for downturned eyes.
Curl controls how visible the lashes are and how much lift they create. The less visible lid space you have to work with, the stronger the curl you need. Hooded eyes need that lift to show above the skin fold. Round eyes need less curl to avoid emphasising their circular shape.
Focus on B, C, and D curls as a beginner. Master these three before you start experimenting with L curls or other specialty options.
Length Patterns: Where to Go Long and Where to Hold Back
For natural looks, work within 8-12mm. For dramatic, 10-14mm. These ranges give you room to create shape without overwhelming the eye or your skill level.
The pattern principle is simple: your longest lengths go where you want to draw the eye. Hooded eyes need length at the centre and outer corners where lashes remain visible. Close-set eyes need it at the outer corners only to pull focus outward. Downturned eyes need it from centre to outer corner to create lift.
Don't go too long too soon. Master the 10-13mm range first. You can create beautiful, customised looks within this range while you build your speed and accuracy.
Mapping Adjustments: Shifting Your Standard Map for Each Shape
Most artists start with a standard map template, then adjust for eye shape. You don't need to create entirely new maps for each client. You need to make small, strategic shifts.
Identify the dominant eye shape feature first. Hooded? Downturned? Close-set? Then shift your longest point accordingly. Mark this adjustment on your map before you start applying. It takes five seconds and prevents you from defaulting to autopilot halfway through the application.
The Consultation Questions That Reveal What Your Client Actually Wants

Ask these questions during every consultation. "Do you want people to notice your lashes or your eyes?" This reveals whether they want dramatic or natural. "How much time do you want to save on makeup?" This tells you if they're replacing mascara or a full eye look. "Show me a lash photo you love." This gives you a visual reference for their expectations.
Also ask: "Have you had lashes before? What did you like or not like about them?" This uncovers past experiences that shape their preferences. "Do you wear glasses?" This affects length choices to prevent lashes hitting the lenses.
Listen more than you talk. Their answers guide every technical choice you make. The consultation isn't about educating them on lash theory. It's about understanding what they actually want to see in the mirror.
When to Override the 'Rules' (And How to Explain It)
Sometimes clients want styles that don't suit their eye shape. A client with round eyes wants a doll-eye map. A client with hooded eyes wants 15mm lengths that will disappear under the hood.
Explain what will happen without being condescending. "This style might make your eyes look smaller than you're hoping for. We could try a modified version that gives you the drama but keeps your eyes looking open. Would you like to see how that looks first?"
If they insist after understanding the outcome, proceed. It's their face and their choice. Your job is informed consent, not control. Just manage expectations clearly and document the conversation.
Don't refuse service over style disagreements. Offer alternatives, explain consequences, then respect their decision.
Building Your Confidence Through Repetition
Eye shape matching feels awkward at first. You'll second-guess yourself. You'll wonder if you're seeing the shape correctly. This is normal. It becomes automatic with practice.
Try this exercise: assess five clients' eye shapes during consultation before looking at their previous lash records. See if your assessment matches what they've had done before and whether they were happy with it. This builds your eye for what works.
Take before and after photos of every client. Review them monthly to see which combinations consistently get the best results. You'll start to notice patterns in what works for your hands and your client base.
The payoff is worth the learning curve. Clients who feel seen and customised for become loyal. They refer friends. They book early. They trust you with their face because you've proven you understand it. That's how you build a business that doesn't rely on constantly finding new clients.

Leave a comment
This site is protected by hCaptcha and the hCaptcha Privacy Policy and Terms of Service apply.